Can You Paint Pressure-Treated Wood?
Pressure-treated lumber is wood, most often southern yellow pine, that has been loaded into a sealed cylinder and treated with a water-based preservative under pressure. The process forces the preservative deep into the wood fibers rather than just coating the surface, which is why treated pine holds up outdoors for roughly 12 to 18 years in most residential applications. This range aligns with the pressure-treated pine fences we install across Ardmore and the Main Line.
Since 2003, most residential pressure-treated lumber sold in the United States has used alkaline copper quaternary (ACQ) or copper azole as the preservative, after the Environmental Protection Agency and the wood treatment industry agreed to phase out the older chromated copper arsenate (CCA) formula for homeowner use. That change affected the chemical, not the moisture. The water that carries the preservative into the wood is what makes fresh treated lumber too wet to paint, and it needs time to work its way back out before any coating will stick.
How Long Before You Can Paint Pressure Treated Lumber
There’s no single date you can circle on a calendar. Drying depends on board thickness, sun exposure, humidity, and how the lumber was stacked before installation. That said, a few patterns hold up across most climates.
| Lumber Type | Typical Drying Time | Why It Varies |
|---|---|---|
| Thin PT fence pickets and trim, full sun | 6 to 10 weeks | Less mass and more surface area to release moisture |
| Standard PT dimensional lumber, posts and rails | 3 to 6 months | Denser stock holds moisture longer at the core |
| PT lumber in humid, coastal, or shaded settings | 6 to 12 months | Ambient humidity slows evaporation from the surface |
| KDAT (kiln dried after treatment) lumber | A few weeks or sooner, confirm with your supplier | Moisture content already brought to 19 percent or below at the mill |
A thin picket in full sun during a dry summer might be ready to paint in six to eight weeks. A pressure-treated 4×4 post set in a shaded, humid yard can hold moisture for closer to a year. When in doubt, wait longer and test before you paint, since redoing a job that failed early costs more time than an extra month of patience ever will.
How Soon Can You Paint Pressure Treated Lumber With KDAT
If your timeline is tight, ask your lumberyard specifically for KDAT stock. Kiln dried after treatment lumber goes back into a kiln after the preservative is applied, which brings the moisture content down to 19 percent or below before it ever leaves the mill, the same benchmark used for standard framing lumber. That’s still not quite low enough to paint the moment you buy it, but it puts you weeks away from a paintable surface instead of months.
The tradeoff is availability and cost. Most big box stores stock standard wet treated lumber rather than KDAT, so you’ll usually need to special order it through a lumberyard. It also costs more per board. For a full fence project, standard pressure treated pine with a longer drying window is usually the more practical choice, which is part of why it remains one of the most requested budget friendly wood options we build.
How Do You Know When Pressure Treated Wood Is Ready to Paint
You do not need expensive equipment to check. Sprinkle a few drops of water onto the wood surface. If the water beads up and sits there, the wood is still holding too much moisture and needs more time. If the water soaks in within a minute or two, the surface is dry enough to move forward.
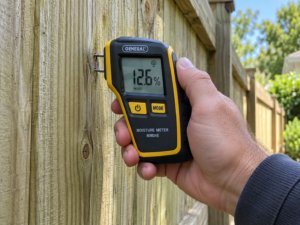
For a more exact answer, a pin style moisture meter, available for well under $30 at most hardware stores, gives you an actual percentage instead of a guess. Paint manufacturers generally set the ceiling at 15 percent moisture content or below for exterior wood surfaces, a benchmark confirmed in Dunn-Edwards’ technical guidance on moisture and surface preparation. Test in a few different spots and at different times of day, since morning dew or recent rain can throw off a single reading.
Can You Paint Over Pressure Treated Lumber That’s Already Installed
If your fence or rail has been standing for a year or more, the wait time above probably does not apply to you. Wood that has weathered outdoors for that long has almost always dropped well below the 15 percent moisture ceiling, so your prep work shifts from waiting to cleaning.
Start by washing the surface with a mild soap and water solution or a light pressure rinse under 1,500 psi, since higher pressure can gouge softwood fibers and open the surface to more moisture. Let it dry for a full day or two. Scrape away any old paint or stain that’s already flaking, and sand rough or raised grain with medium grit sandpaper so the primer has something to grip. Once the surface is clean, dry, and smooth, you can prime and paint an older treated fence the same way you would a newly dried board.
Can You Paint or Stain Pressure Treated Lumber
Both are valid options, and the right call comes down to how much wood grain you want visible and how often you’re willing to redo the finish.
| Factor | Paint | Stain |
|---|---|---|
| Look | Solid color, covers the wood grain | Grain shows through with semi-transparent, more opaque with solid color stain |
| Typical time before recoat | 5 to 10 years with a quality acrylic exterior paint | 2 to 4 years for semi-transparent, 4 to 6 years for solid stain |
| How it handles wood movement | Sits on the surface, can crack as PT wood swells and shrinks | Soaks into the fibers and flexes with the wood |
| Prep work | Primer strongly recommended | Primer usually not needed |
| Good fit for | Fences and rails matched to a specific trim color | Fences and pickets where you want the wood to still read as wood |
Pressure-treated pine already carries a faint green or brown cast from the treatment chemicals, which is part of why a lot of homeowners on the Main Line lean toward a semi-transparent stain that works with that tone rather than paint that has to fully cover it.
How to Paint Pressure Treated Lumber Step by Step
- Confirm the wood is dry using the water drop test or a moisture meter reading of 15 percent or below.
- Wash the surface with mild soap and water or a light pressure rinse under 1,500 psi, then let it dry for 24 to 48 hours.
- Scrape away any loose or failing coating and sand rough or raised grain with medium grit sandpaper.
- Apply one coat of an exterior primer labeled for use on pressure-treated wood and let it cure fully per the label.
- Apply two thin coats of 100 percent acrylic latex exterior paint rather than one heavy coat, letting each coat dry fully before the next.
- Plan on a light inspection each spring and a full recoat roughly every 5 to 10 years depending on sun exposure.
What Paint and Primer Work Best on Pressure Treated Wood
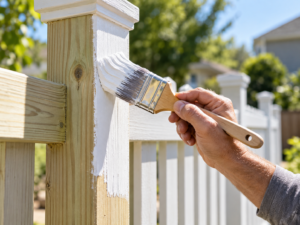
Most professional painters reach for 100 percent acrylic latex paint on treated lumber, and for good reason. Latex paint stays flexible as the wood expands and contracts with temperature and humidity, and it lets residual moisture pass through the film instead of trapping it underneath. Straight oil-based paint tends to sit more rigidly on the surface, which makes it more prone to cracking as pressure-treated wood continues to move through its first few years outdoors.
Primer matters just as much as the topcoat. Look for a product labeled specifically for pressure-treated or exterior wood rather than a general-purpose primer, since these formulas are built to bond with the chemical residue left in the wood’s surface fibers. Some professional painters still pair an oil-based bonding primer with a latex topcoat for extra adhesion on rough or weathered boards, so check your paint manufacturer’s guidance if you’re working with reclaimed or older stock, and always confirm the primer and topcoat are labeled compatible before you buy either one.
Mistakes That Cause Paint to Fail on Treated Lumber
- Painting straight off the store shelf before the wood has had real time to dry
- Skipping the water test and guessing based on how the wood looks or feels
- Applying one heavy coat instead of two thin ones
- Reaching for an oil-based paint that fights the wood’s natural movement
- Power washing above 1,500 psi, which can gouge softwood fibers and drive more moisture into the surface
FAQs
Can you paint pressure treated wood right after it’s installed
Usually not. Fresh pressure treated lumber is typically too wet to hold paint the day it goes up. Give it time to dry and check with a water drop test or moisture meter before you start.
How long does pressure treated wood need to dry before painting
Most standard treated lumber needs 3 to 6 months, though thin pickets in full sun can be ready sooner and thick posts in humid, shaded spots can take up to a year.
Do you need a primer to paint pressure treated wood
Yes, in almost every case. A primer labeled for pressure treated or exterior wood helps the topcoat bond to the chemical residue on the surface and improves how long the paint job lasts.
What happens if you paint pressure treated wood too soon
The trapped moisture has nowhere to go and pushes against the paint film from underneath as it works its way out, which shows up as bubbling, cracking, and peeling, often within the same season.
Is it better to paint or stain a pressure treated fence
It depends on how much wood grain you want to see and how often you want to redo the finish. Stain tends to need less prep and flexes better with the wood, while paint offers more color options and heavier coverage.
Get a Fence Finish That Actually Lasts
Patience is really the whole answer here. Pressure treated lumber will accept paint just fine, it just needs time to finish drying from the treatment process before any coating has a fair shot at sticking. Test before you paint, choose 100 percent acrylic latex over a primer built for treated wood, and give each coat the time it needs to cure.
If you’re planning a new fence rather than repainting an old one, it’s worth deciding upfront how much upkeep you actually want to take on. Super Fence Co has installed pressure treated pine, cedar, vinyl, and composite fences across Ardmore, the Main Line, and the surrounding counties since 2002, and our on site estimators can walk you through which material fits your yard, your budget, and your appetite for repainting down the road. If maintenance free sounds better than a recoat schedule, our composite line skips the paint question altogether.
Request a free on site estimate and we’ll help you land on a fence you won’t have to think twice about.